17th Century Witches Trial Scene
For this project, I will be developing a 3D environment for Explore Malmesbury. Explore Malmesbury is a community project led by the Malmesbury town team, created to tell stories about the history of Malmesbury in the places they happened. Campbell Ritchie (my Client) is a representative of Explore Malmesbury and is who I will be referring to for any guidance or feedback about the direction of the project. The Explore Malemsbury web app includes a map with themed trails, “Explore!” immersive tours and many POIs (points of information). The goal of this project is to create an atmospheric 3D interpretation of the outside and inside of the home of one of the witches accused in Malmesbury in the 17th century. This representation should increase footfall and interest in and around the historic town of Malmesbury.
Elizabeth Peacock
17th-century writer John Aubrey wrote about the witches in Malmesbury. Sometime in the 1670s, a major witch trial took place in Malmesbury. Reports of “odd things” like using powers to fly about on sticks. The punishment for some women was to be hanged. Aubrey had a reputation for being unreliable with facts. Other sources confirm that the trials took place but obviously women in the 17th century were not capable of magic. Aubrey claims that seven or eight women were accused but other sources confirm it was four, the leader of the coven being Elizabeth Peacock. They were accused of bewitching horses and murdering children using witchcraft amongst other things…
Elizabeth peacock died three years after her trial in 1672. She was buried in Malmesbury Abbey on the 24th of June 1675. She also left a will that still exists. Although a lot about her is unknown, her will provided some insight into what her home was like. Her will only listed 3 items valued at a total of £5 10s. Her clothes were valued at 10s, her bed which was also valued at 10s and her house which was valued at £4 10s.
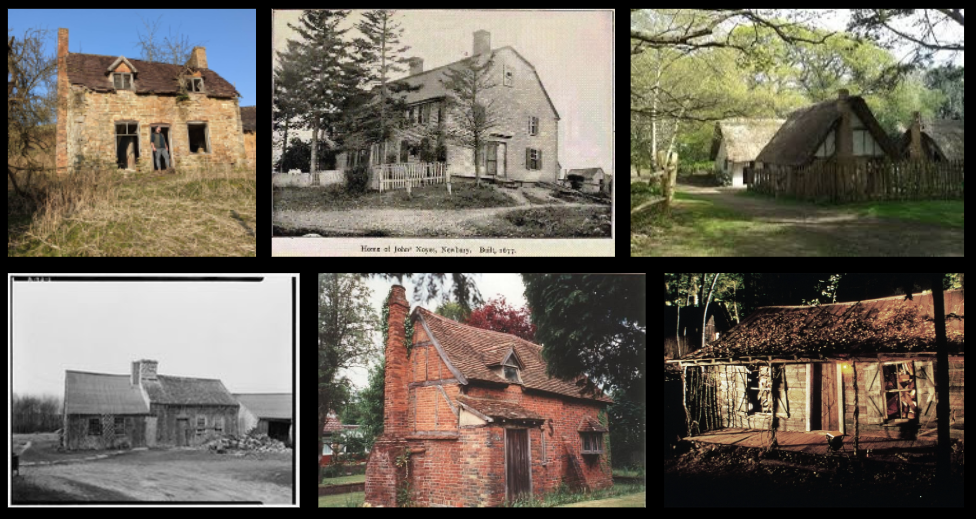
17th-century exteriors
During the planning stage, my partner Abi and I decided that I would design and develop the exterior of the house and she would design the interior although later I found myself researching and designing some of the interiors too. Based on my research about the value of Elizabeth Peacocks house, I knew I needed to be looking for very small buildings roughly 8 metres wide. Despite this, I also looked at buildings of all different shapes and sizes to gain an understanding of the architecture in the 17th century. Using tools like Pinterest. amongst other things, I produced a mood board of examples of 17th-century homes, some that are still standing today. Another source of inspiration was the cabin from the Evil Dead series. Although I wasn’t planning on making a wooden cabin, the shape of it closely resembled my vision. Based on my mood board I was able to identify features commonly found in 17th-century architecture. These included wooden support beams visible from the exterior of the house, tiled roofs, and wooden doors amongst other things. My favourite of these was the top-left image on my mood board. In terms of footprint, I felt it was a perfect size. Some specific details I loved were the duel, exterior chimneys at each end of the house and the upper windows that peak through the roof. I would later find out that these details raised some issues with historical accuracy which I will discuss in greater detail later. A few more noteworthy details include the entrance in the bottom-centre image that extends out of the house and the supporting brickwork at the edges of the house that can be found in the top-left image.
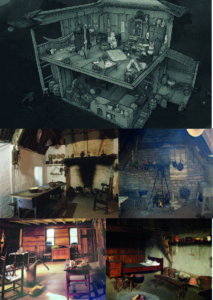
17th-century interiors
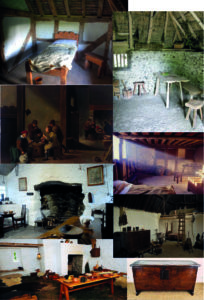
During the planning phase of this project, Abi and I both made multiple mood boards to get a better understanding of how the inside of a house may have looked in the 17th century. An immediate hurdle that we ran into was that many of the images available online showing rooms and objects from the 17th century would have been owned by wealthy elites of the time, and were therefore maintained and restored. This is an issue that was mentioned by our peers after a presentation in class which we quickly set right. After some more rigorous searching, the second set of mood boards produced by Abi was far more suitable. These images show details such as how raw and untreated the wood is and how uneven the edges of every piece of furniture and architecture are. They also show how a room is laid out and the objects you may find in a room from that period.
Abi and I then produced a list of objects to populate the house with, some objects being chosen for their historical accuracy and others for the atmosphere that they would help build. Included in our original list were as follows:
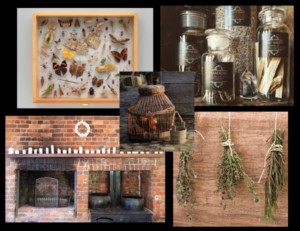
Hanging herbs, Sage, Animal cages, Insects in displays, Old books and scrolls, Quill and ink, Bookshelf, Animal skulls and bones, Animal hide, Jars and Bottles, Candles, Fireplace, Stacked firewood, Clock, Witches stove, Pots and pans, Cabinets, Shelves, Chest, Barrel, Stools, Tables and chairs, Bed, Vegetables and flowers, Chamber pot
It was at this point that we had our first meeting with our client. I knew how important historical accuracy was to this project so I asked Campbell to verify each item on the list. This meeting proved to be very valuable. Something that Abi and I had previously failed to realise was that a lower-class person such as Elizabeth Peacock was likely unable to read or write. This is verified by her signature on her will which is essentially an incoherent squiggly line. This meant that we would be unable to include objects like bookshelves, Quills and ink, old books and scrolls and even clocks as she was also likely unable to read those too. There were also other objects that I had chosen to help build the atmosphere which was just too unrealistic to be included. These included Insects in displays and animal bones and hides. Lastly, we agreed we should combine the fireplace and stove as in this period, a home this small would be unlikely to have both. Although I still believe these aspects would have added to the scene visually, I do agree that since they aren’t based on historical accuracy including them would contradict the brief.
Initial Interior designs
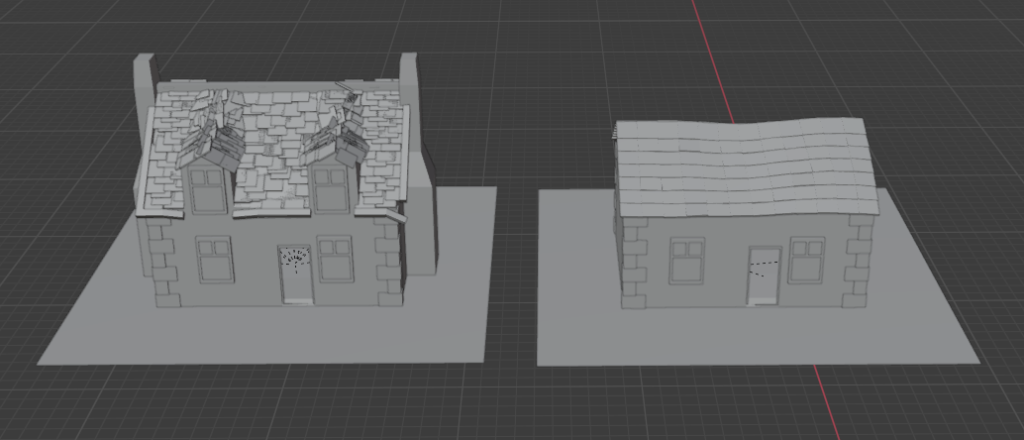
When creating a 3D model, I find it more helpful to plan it using simple shapes in 3D, rather than sketching. For my first model, I was closely inspired by the top left image on the extirior mood board. As mentioned previously I liked the windows that extruded out of the roof and the exterior chimneys on each side of the building. After consulting my client I quickly discovered this wouldn’t be suitable. Her house was unlikely to have had two chimneys and the chimney she had, would likely not have been external. As well as this she would not have had a second floor in her house so the upper floor windows on the roof needed to go as well.
My second design was far more grounded in reality. I completely redesigned the roof to be more appropriate. Once I removed the upper windows I realised that the messy, broken style for the roof tiles didn’t work anymore aesthetically. To fix this I replaced them with neat and uniform tiles. Whilst they are far neater than my original draft they are still suitably warped as they would have been on a house from that period. I also made sure to include many slightly out of place tiles to make the house look worn. The second draft I made was much simpler in the number of details than the first but since it is the design I would decide to use, I would develop them further at a later date.
Final Exterior designs
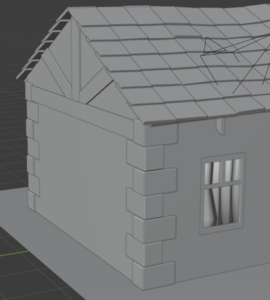
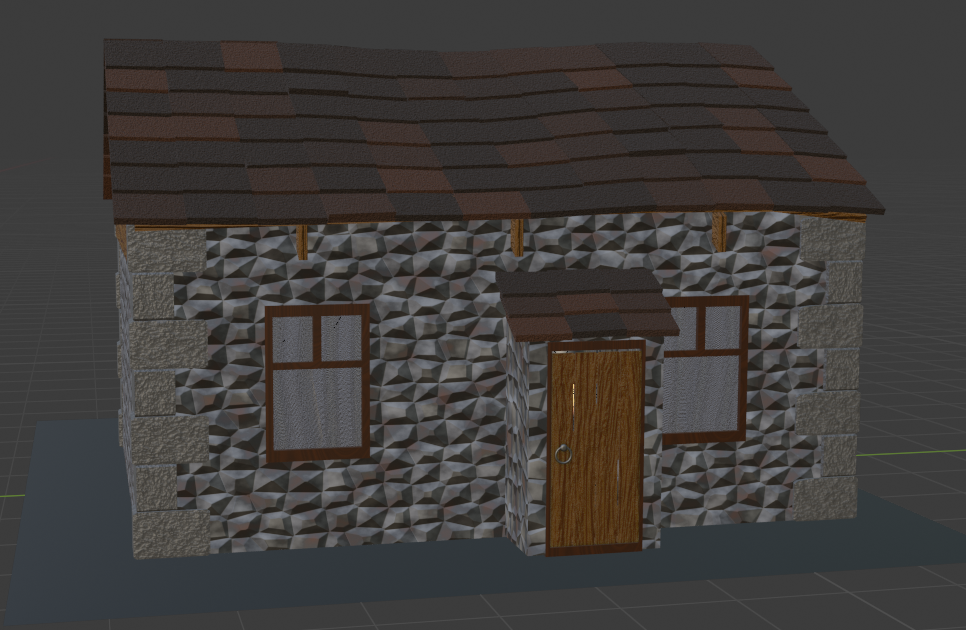
As mentioned before, my final exterior design would be based on my second draft and I developed that design in a few ways. Firstly I knew that this design, although more suitable for its purpose, has fewer details and in my opinion, didn’t look as good as the original. I hoped to change this by adding details on the exterior that didn’t compromise its historical accuracy. I designed a few different roof supports inspired by images from my mood board. The left and right exterior walls have a beam going vertically across the wall with more beams branching off this one towards the roof. From the front, you can also see thin vertical beams that run up the inside of the house on the ceiling. You can see these supports extruding out of the front of the house, just under the roof.
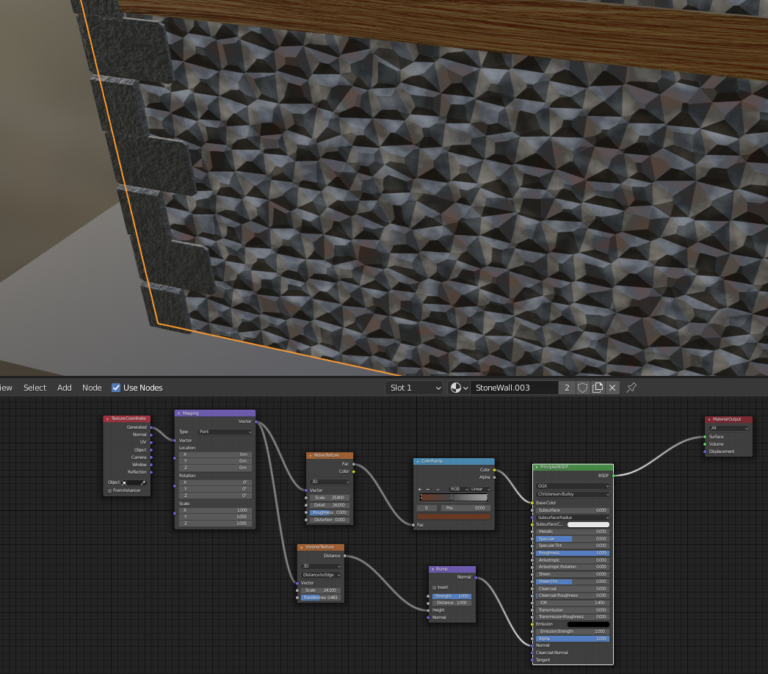
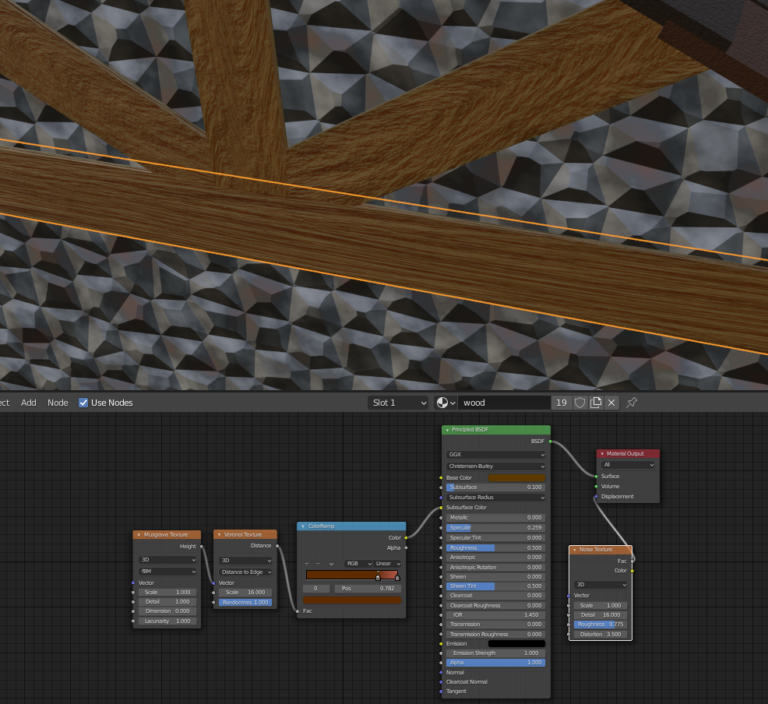
For the texture of the exterior wall, I was inspired by flint walls that I have seen during my research and also that I have noticed when walking around Winchester. The flint is coloured mostly grey with brownish undertones in places. The shape of the flint usually resembles a hexagon or a similar shape with each edge being a different length. To achieve the colour of the stone I ran a noise texture through a colour ramp ranging from grey to brown. I then plugged that into the base colour on a Principled BSDF node. To make the texture look like layered bricks I ran a Voronoi texture into a bump node and then plugged that into the normal on the principled BSDF.
Next was the wood textures for the beams. I would also go on to use this texture for many other wooden objects. In the examples I could find, poorer people’s houses used very raw, non-treated looking wood. The wood had a more textured, deeper grain and looked very splintery. To achieve this I first made the base colour an appropriate shade of brown and connected a noise texture with the detail and roughness increased to the displacement plug on the material output node. This would give the rough, untreated wood effect. I then ran a colour ramp with Voronoi texture connected to the factor into the subsurface colour for some additional detail.
Finally, I added an entrance that extrudes out of the front of the house. This was also inspired by images of houses from the 17th century. I feel that having this extension gives the exterior more layers and helps bring back some of what was lost when redesigning my first draft. Before adding this I felt that the roof was too linear and flat but the additional roof for the extension does a great job of adding some of that missing detail. Whilst creating this extended entrance I needed to make a door. After referring to my research I began making a door made out of separate wooden planks that were parallel to each other, held together with structural planks on the back of the door.
Initial interior
To prepare the interior to be populated with furniture I knew I needed three things: a ceiling, a floor and a dividing wall to create two rooms. The wall just needed to use the same brick texture as the exterior walls and it needed a suitably sized doorway. I made sure to make this wall a separate object from the exterior walls so that I had the option to change the size ratio of each room at a later date. The floor was also a very simple process. I had two options when it came to the floor. Firstly I could have made the floor a dusty stone that connected to the walls or I could make some floorboards. I decided to use floorboards as I find them more aesthetically pleasing. The floorboards are made up of planks I made using the same wood texture as the exterior beams. Finally, I got to the ceiling. The ceiling, much like the floor is made up of wooden planks. Holding these planks in place are multiple support beams that are based on images of ceilings from the 17th century.
Bedroom
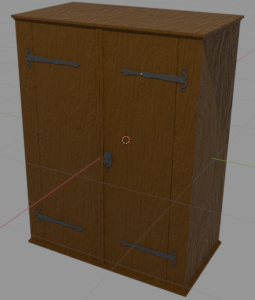
When designing the furniture, the fact that Elizabeth Peacock wouldn’t have owned expensive things was a very limiting factor. Examples of furniture were often very simple in their design whilst also appearing slightly warped. Whilst this was also true for the cupboard model, I was able to have some fun with the hinges. The flat metal plates that the hinges are attached to are often made into curvy elegant shapes.
One of the three possessions Elizabeth Peacock named in her will was her bed so I knew that this model would be important to my client and Explore Malmesbury. Lower class beds of the time all followed a similar design. An all-wood frame with a solid wooden headboard. Higher class beds had many more variations but the one that Elizabeth Peacock had would likely have minimal details. For my model, I chose to add bed knobs on each corner of the bed. The headboard also has some faint, simple patterns too. I found the best way to create a natural-looking sheet for the bed was using bed physics. To my surprise, this process is a lot simpler than I first thought. Firstly, I created a plane and added many subdivisions so that the sheet could realistically flex and bend. Next, I folded the pillow end of the blanket back on itself and added many creases so that when the physics were applied it would fall more realistically. Once the sheet was ready I applied a cloth physics system to it and applied collision physics to every object the sheet would come into contact with like the mattress, pillow and bedframe. Once I had positioned the blanket so that it was hovering over the bed, I hit the play animation button and watched the blanket fall onto the bed. This process allowed me to make the sheet fit the bed perfectly, resting on the pillow and dangling naturally from the edges. Finally, I found a keyframe in the animation that was most suitable and baked it so that the sheet would only ever appear in this position.

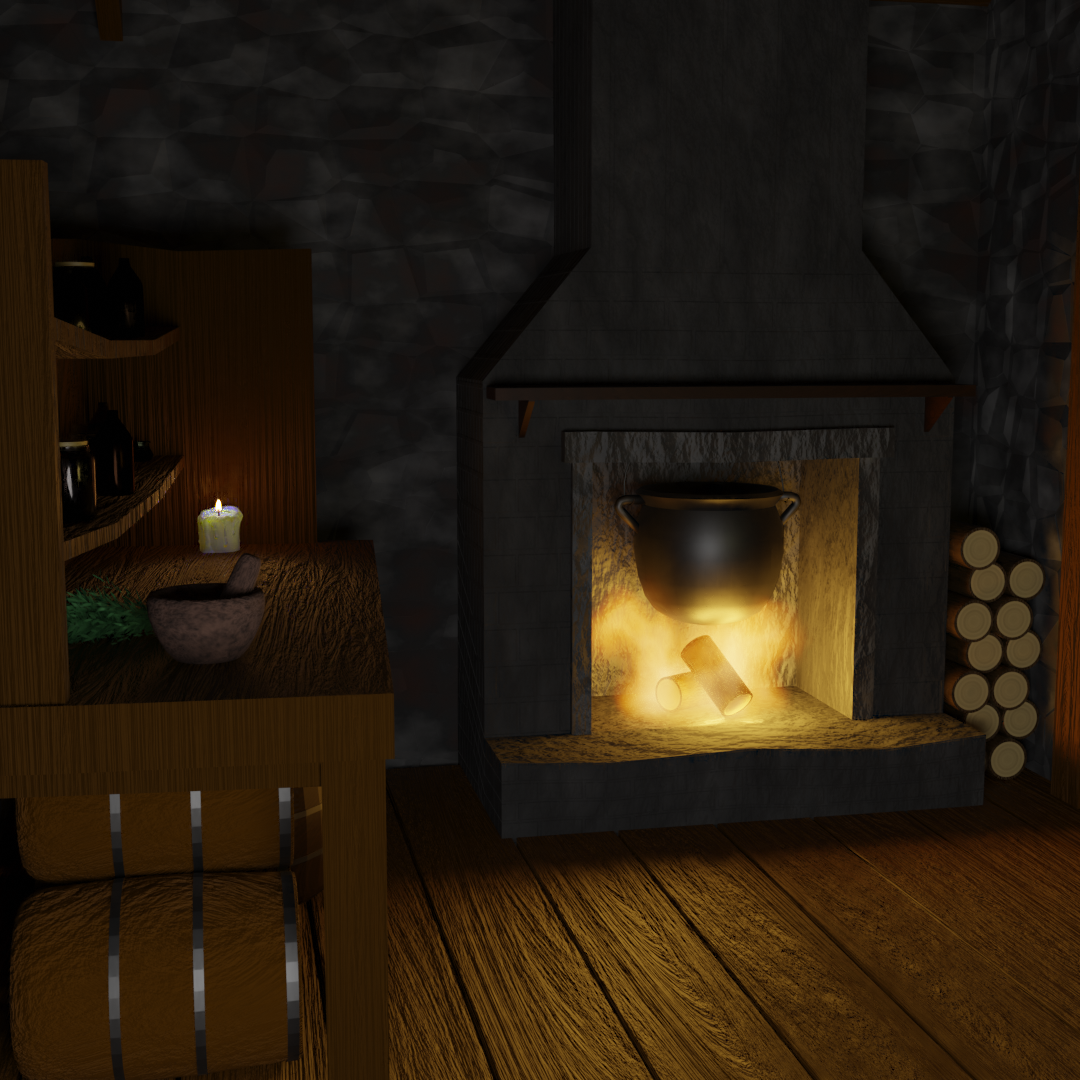
Main Room
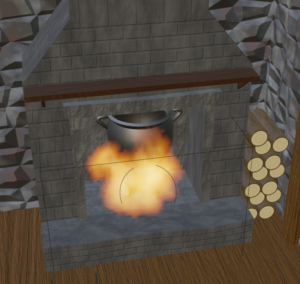
The main room is made up of many different areas. When you enter through the door the first thing you would notice is the fireplace on the opposite wall on the right-hand side. Your attention would then be drawn to the work area next to it on the left-hand wall. Finally when you’ve entered the room and turned around you would notice the table in the corner near the doorway and all the herbs hanging from ropes on the wall above it.
The fireplace is large and holds a shelf on the front. I made some logs that sit inside the fireplace and that are also stacked between the fireplace and the wall. To create the bark on these logs I lead a Voronoi texture into a bump node and scaled it larger on the x-axis. I then used a noise node and a colour ramp to achieve the colour. To create the fire in the fireplace I used a fluid physics property with a fire flow type.
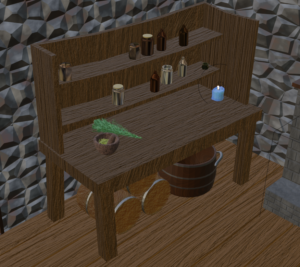
For the work area, my goal was to make it look like someone used it every day. I achieved this by cluttering the shelves with various jars and bottles, therefore populating the area. On the table itself, you can find a pestle and mortar that would have been used to grind up the herbs found covering the left-hand wall. Beneath the table, you can find barrels and buckets.
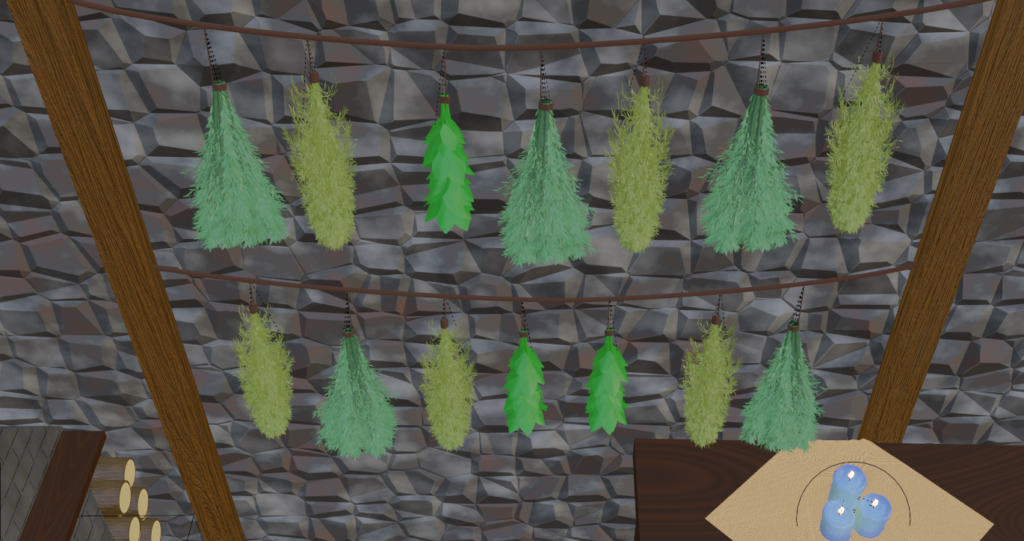
To create the herbs hanging from the wall I used an add on called a sapling tree generator. This addon automatically creates a “tree trunk” with randomly generated branches coming off of it and leaves randomly generating off of the branches. Many factors can be edited like brach radius, brach splitting and brach growth amongst many other things. For the wall of herbs, I created three different designs; one where the leaves are more dry, dense and tightly woven, another that is branching out wider as it goes down and finally another in which I created custom leaves. This one has very large leaves and the default leaves that the add on uses are very simple.
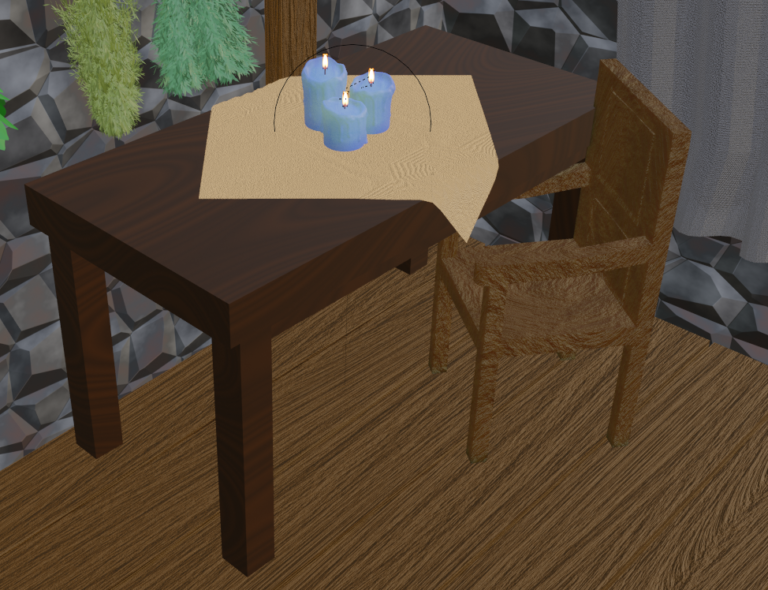
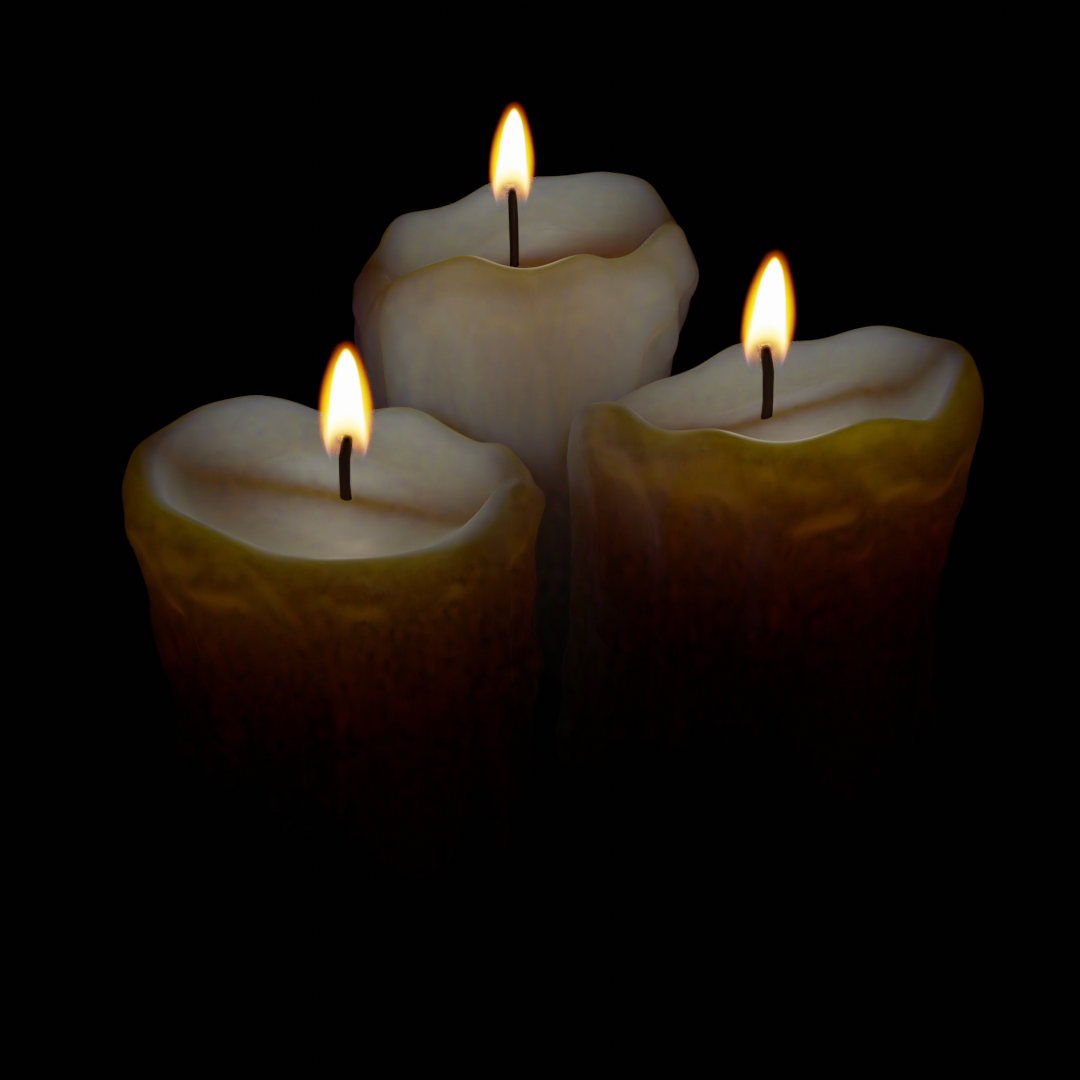
On the opposite side of the room, you can find a table. I imagined this table to be where Elizabeth Peacock ate her meals. For this space, I created a chair as well as a table cloth. In the centre of this table are a trio of candles. To make these candles I first started with a cylinder. I began by editing the cylinder into a vague candle shape. I created an inset face on the top of the cylinder and used the extrude tool to create a well. Next, I temporarily added a subdivide surface modifier whilst I was making adjustments to get a better idea of how it would look once I had smoothed all the surfaces. Next, I re-meshed the model. This converts the mesh into something that is more appropriate for sculpting. Once I had re-meshed I smoothed out the edges and started applying the melted effect using the draw tool. This involved drawing a build-up of the melted wax along the rim of the candle as this is where most of the wax will accumulate. After that, I added drips of wax running down the sides all the way around the candle. These drips bulged out slightly whilst running down the candle and they end with a larger buildup of wax at the bottom. Finally, I added subsurface scattering to the texture of the candle to allow some light to shine through the wax, giving it a slight glow.
Final Renders
VR
After I finished my scene it was time to move it into Unity to make it viewable in virtual reality. Throughout development, I made sure to follow some rules to make sure that the scene ran well in VR. Firstly, I completely avoided transparent objects. Transparent objects can multiply the amount of processing that needs to be done at any time. If I had made my bottles and jars transparent, my computer would have to process the bottle itself and whatever is behind it whilst also appropriately distorting what is behind the glass. Virtual reality needs to process everything twice as each eye is showing a slightly different angle. On top of this, it needs to be running at 90 FPS to avoid motion sickness. As well as this it’s important to keep the polygon count as low as it can be which I did wherever I could. The project brief required me to make still images of the scene but there are some objects that optimisation for VR could affect the quality of the renders. An example of this is the candle model. I sculpted the candles in order to achieve a realistic wax effect. Unfortunately, this meant that they were made up of many polygons. I didn’t want VR optimisation to affect the quality of my renders for my client so I decided I would make separate, low poly versions if it was necessary.
To view my scene in virtual reality I used the Unity game engine. Within Unity, I used the ‘XR Interaction toolkit’ add on. I was successful in importing my scene into Unity and viewing it in virtual reality but a few things were lost in the transition. Unfortunately, only base colours for textures were transitioned across and the lighting in scenes appeared different than it did in Blender. Unfortunately due to insufficient hardware at home, I was unable to fix these issues. My goal is to acquire the appropriate hardware and fix these issues over the summer.
Conclusion
Now that the time has come to submit this project I am very pleased with what I have achieved. I have managed to design, with some help from Abi, and create the full interior exterior of the Elizabeth Peacock’s house. The final product does closely resemble the vision I had for it once we had finished the research. There is a change I would make to the process if I were given the opportunity to do it again. I would have made great use of a larger team including some more 3D designers and maybe a developer. One aspect of the project that I wish I had more time to develop was virtual reality. During this project, I spent most of my time developing 3D models for scenes. I began to develop the VR application but since this happened so close to the end of the semester, I moved back home and found I had insufficient hardware to develop further. One aspect of this project that I think we did well was keeping in contact with our client. Abi and I attend meetings with Campbell every two weeks for the whole project to verify the work we were producing was fit for the purpose. This positively impacted the project considerably
After submission, I have agreed to continue the project with my client. These are still a few more aspects of the scene that need to be completed before it can be featured on Explore Malmesbury. Although the interior and exterior of the building are complete, the exterior still needs some terrain to sit on. As well as this, Campbell and I discussed an animation where the camera explores all of the details in this model on the inside and outside. Finally, I would also like to further develop this scene in Unity for virtual reality. Although I would love to do this, I would need to source the correct hardware to do so.